Tuesday, October 30, 2012

Scooby Doo, Where are you?!

As some of you may know already I'm trying really hard to make this a smaller, more meaningful Christmas. I must admit without cable we have no commercials, which means the girls have a smaller almost non existent Christmas list.

This was the year we outgrew Princesses. Sad, but true. This year it's all about Scooby-Doo! and what better way to commemorate that then to make their dolls costumes so they can play Scooby-Doo too?
All the patternes I used are from: (agplaythings.com). You can print them for FREE. I used: Kirstens party dress, Felicity's Holiday gown (sleeves only) and Josefina's Camisa's dress.


VELMA:
Orange felt
Red fabric


 I used Kirsten's party dress top, I added about one inch to the bottom and a 1/8 of an inch all the way around and about 1 1/4 inches to the bottom.

 You will cut the top pattern once on a FOLD for the front and then two separate pieces for the back. Then you will sew the sleeves together. Since I used felt I did not have to hem at all.

 For the sleeves I used Felicity's Holiday sleeve pattern and added about  1 1/2 inches to the length. After I fitted it to the top I cut the excess fabric off. Then I added Velcro to the back.

To make the "turtle neck" 
I cut a strip of felt (the longest I could on the piece I had) and accordion style folded it and sewed it to the neck/back neck line


For the skirt I also used Kirstens party skirt. However I shortened it to knee high. After I cut out the fabric, I gathered the skirt at the top to fit the waist/belt strip.

 Then I began pleating the skirt. I did this by making an "A" out of the fabric and pinning it down. Once I was finished I sewed it together and ironed the skirt to add more definition.

For the Shoes and Glasses:
I bought them at Michaels with 40% off coupons. I pushed out the sun glass lens with the glasses to make them look more like Velma. The magnifying glass is a small glasses repair kit I had lying around.

SCOOBY-DOO
*Teal Felt
*Yellow felt
*Green Felt


 note: I used the reverse colors for the diamond and SD


Measure the neck of the dog you're going to use (we have Chocolate Chips from the AG store). Cut appropriate length and width (you have to eye it). Add Velcro to the back to keep it on. Cut a diamond out of green. Cut thin strips of yellow and shape them around the green to make an outline and a S and D for the middle part of the collar. Hand sew on.  Hand sew onto teal felt.


DAPHNE:

Purple,
Light purple
Green

I printed off Josefina's Camisa's dress pattern, cut it out and made these alterations: 
*Made it shorter
* less wide (about as wide as the Kirsten birthday top)


Begin with pinning the pattern to the fabric (one on a fold and two for the back)  To make the light purple strips on her dress, I cut out long strips (the length of each piece) and added that to the bottom, sleeves and middle ribbon/design. Making sure to fold in the raw edges for a clean look.


 After that I sewed the dress together. It was still WAY too big. So I turned the dress inside out and pinned the dress a little more fitted. Then I sewed that together, tested it, liked it and cut the excess fabric off.


For the ascot I wrapped the
I used this pattern for the head band
For the Shoes I bought them at Michaels with a 40% off coupon.


**If you found this funny, useful or made it, follow me and share your pictures!**

My other American Girl items:
school supplies
feel better kit  (Just like McKenna's!)
Gymnastics accessories
head band
Minnie Mouse ears
sleeping bags
sleeping mask
pillow dress
accessories
pet accessories
generic witch costume
Tutu Style Witch Costume

Sunday, October 21, 2012

Our Spooktacular Halloween Party

 Our party was a pot luck Halloween inspired party. It was a lot of fun and I admit less stressful! Okay, only slightly  less stressful because I was so busy all week that I was still getting things ready when the kids started coming. I don't have an extensive amount of space in my apartment, so I took my kitchen island (it's always against the wall and next to a counter) and covered both of them with a tablecloth
.

  COOKIE
http://www.mrsfields.com/gifts/Jack-O-Lantern
My husband almost bought this cookie for our Halloween party when he saw it online.  Quite frankly I'm not a fan of Mrs. Fields online cookies. The one time we got them for Easter they were crumbling in your mouth (in a bad way) and just did not taste right. If I'm going to eat Mrs. Fields it must be fresh. I also knew that it was fairly easy to replicate this. I started by greasing a pizza pan. Then I cut open the package of Pillsburry sugar cookie mix (I had to change the cookie flavor because a girl at the party is allergic to dairy). I used a greased rolling pin to flatten most of the dough, then used my hands to shape it into a pumpkin. I did not take it all the way to the end because it WILL expand.
I baked it at a lower temperature (325) for about 15 minutes. It came out a nice golden brown. When it cooled I iced the cookie. I did not have any green icing, but I did have green food spray. I added orange colored sprinkles to the rim.

CAKE
http://www.bettycrocker.com/recipes/pull-apart-spiderweb-cupcakes/325ad00b-96d4-4e9b-8750-d219bbe53ce6?nicam4=SocialMedia&nichn4=Pinterest&niseg4=BettyCrocker&nicreatID4=Post


I started the cupcake cake by baking 14 vegan chocolate cupcakes. While they were cooling I took a cookie sheet and covered it in paper to make it look nice.  When they were cooled I arranged the cupcakes on the tray (they kind of looked like a snow flake). I took the orange icing and smoothed it all over the top. Now this is where I strayed from the original. I took a Betty Crocker pre-made icing tube in black and made the web. They made black rings and ran a tooth pick through it.

http://www.aturtleslifeforme.com/search?updated-max=2011-11-02T21%253A10%253A00-04%253A00&max-results=7

I'm now reminding people who don't visit often of two things: I don't always get the pins right because I don't have these objects on hand and 2) I do them from memory sometimes.  So, I made the green vanilla pudding yesterday morning. I set it into the green cups I had (it would have looked cooler if I had had clear) and after they set awhile added chocolate sprinkles to the top. Here is my mistake: I forgot to add faces to the cups BEFORE putting the pudding in so when I went to draw on them with sharpie everything was smearing because of the condensation.

WITCHES BREW:
http://pinterest.com/pin/195765915023710442/

I only got the idea from pintrest, I then saw that Target sold both the cauldron and two punch mixes for $8. All I had to do was add soda. Which fizzed all over the place when I mixed it (the girls thought that was hilarious) . Two days before I made the ice hands by freezing water in a glove. First, the glove didn't want to come off when I was ready to use it, then it didn't want to fit in the cauldron and I had to break the fingers. It fit after that.

The Veggie Skeleton Man

Mummy Dogs


Another angle of the food (you can almost see the witch wands, but not really.


Other foods we had: Orange and black tortilla chips, cupcake flavored goldfish, grapes, bananas, oranges, and Halloween Rice krispies:


GAMES and CRAFTS:

 You can also just make a bean bag toss by having the kids throw the bean bags into caludrons or other trick or treat buckets.

Decorate a pumpkin
So like I've mentioned earlier we grew enough pumpkins in our garden to accommodate all the girls that were invited to the party. To make it fair we numbered each pumpkin and numbered pieces of papers in a bowl. The girls had to chose from the bucket and that determined their pumpkin.
Once everyone had a pumpkin they went back to the table where they added feathers, google eyes, glittler, marker, pom poms, pipe cleaners, or their Halloween masks. I was amazed at how long the kids took the decorate, but used hardly any of the stuff. Make sure the tables are covered with newspaper or something that you do not mind
 The girls being silly


Masks

All we dud was print the masks and have the girls decorate them however they wanted.

Find the mask here


Halloween Bingo (can be purchased at Target)
 If you don't buy it at the store it's easy to google search

Pin the nose to the Jack O' Lantern
Also bought at Target

"Who am I Halloween edition"

I took index cards and drew pictures of  Halloween things (Cat, Witch, Ghost, Jack O' Lantern, Mummy, Frankenstein, Spider, Candy, Skeleton, and Bat). You have the kids sit in a circle and you tape the  card to their forehead. They have to guess what is on the card by asking yes or no questions. Unfortunately I left the room twice and the girls all peeked int he reflection of the TV to find out what they were. Haha it was fun anyway.
"My Dear Friend Witchie-poo

Since they were still sitting in a circle I draped a black table cloth over their laps.Now, I don't know what this game is actually called. But I remember playing it when I was younger and it stuck with  me. I started by taking five bags and writing things like "Eye, fingers, skin, brains and hair" The kids have to feel the objects in the bag without looking and guess what they are
.I told the girls my dear friend Witchie-poo died and left me her remains. These were here eyes. I then passed around the bag that contained peeled grapes. Then her greasy  hair (cooked, cold spaghetti which had some oil on it), Her fingers (cooked carrots), her skin (cooked tortilla), and her brains (pumpkin guts). You have got to take pictures of their reactions- it's priceless.


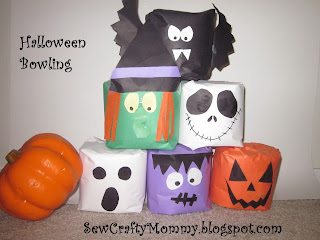
Halloween Bowling

I took the toilet paper rolls and wrapped them in colored parchment type paper, tapped them and folded the tops and bottoms down like I was wrapping a present. Make sure they are flat because you'll need to stack them. Then added the faces I used Sharpie for the eyes:
A Bat ( Black paper, white eyes and pointed teeth) 
 a ghost  (white paper black circular eyes and an oval mouth
Witch (later turned into a zombie) Yellow eyes, orange hair or black for nose and mouth (like Jack's)
Jack Skellington (white paper, black eyes and nose, mouth drawn on with sharpie, 
purple monsters (purple paper, white eyes, jagged hair and "stitched mouth") 
and a jack o'lantern. We also are using a Styrofoam pumpkin instead of real one

The Erupting Pumpkin


We are very into science in our house. So it only felt fitting to have at least one science experiment at the Halloween party. We had seen an erupting volcano before, but a pumpkin? Oh this we had to do. Luckily we had grown well over enough pumpkins in our garden to accommodate all the girls at the party as well as the erupting pumpkin. Before the party I cut, scooped and carved it. While the girls' (all nine of them) gathered in the entry way of my kitchen I sprinkled a bunch of baking soda at the base of the pumpkin. Next we chose some green food coloring to add a little color- who wants white?
Then I added the vinegar and it began to foam. I really wish I had been able to get it on tape because the girls' were all amazed and it really was cool to watch it foam and go everywhere.

PHOTO BOOTH

To make the actual "booth" I took an orange table cloth and tacked it up against my door.
 .While I was at Target I happened to find a 4 pack of mustaches for $1 and thought they would go great for our booth. If you can't find it the easiest way to do it is: print the picture you want, transfer it onto cardboard, cut it out on felt.

Once it is on cardboard I pinned it to the color of felt that I needed and cut that out. I turned on my hot glue gun and let that warm up while I snipped the sharp parts of the kabob sticks off. For some added fanciness try wrapping the stick with ribbons. When the glue gun was ready I glued it all down.

Girly props


Then we added Halloween inspired:

all you have to do is make the lips, cut out the middles and add white triangle pieces for the fangs. Super easy!

If you found this funny, useful or anything in between please follow me. Thanks!


Friday, October 19, 2012

Halloween Hair


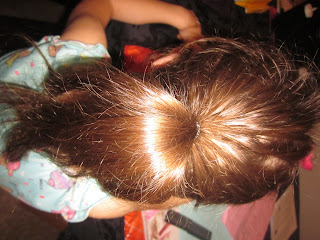
Once a week when Hannah wears her Halloween shirt we also give her Halloween styled hair. So far we've only done the one style. Today we decided to try to make a spider. The results were just absolutely adorable. First we started with a pony tail

Then I twisted her hair into a bun and pinned it down. This is the tricky part: maneuvering four regular length black pipe cleaners through the bun to make the eight legs. To make the eyes we took two bobbi pins and hot glued the google eyes to them and then pinned it into the middle bun.

**If you found this helpful, funny or anything in between, please consider following me. Thanks!**

Monday, October 15, 2012

Travel tips

We visit the Mouse in Southern CA quite a bit. It gets expensive though because we have to buy something to eat. Not only do I hate spending extra money, but I also feel  kinda sick after eating all the greasy food.

Not anymore. I think after eight years of road trips with my husband, I've finally perfected a way to make vacations a little less expensive. You must be committed to doing this for it to work.


In the cooler I have:
Go-gurt (frozen)
Coffee Creamer
1/4 gallon of Milk
Apples (or pre cut apple slices)
Grapes
Carrots
Water bottles (1/2 are frozen)
Rockstars
Lunch meat
Lettuce
Jelly
Small packets of condiments that you pick up if you eat out (ask for the mustard and mayonnaise)

I like to put the frozen water bottles all around the milk, creamer and meat.

I also pack in another bag:
Bread
Peanut Butter
Goldfish
Chips
plastic bowls
spoons
napkins
Just add water coffee
At least one box of cereal that everyone will eat.


What I do:

A day and a half before: 
freeze half our water bottles and the go-gurts. The water bottles act as ice packs and the go-gurt stays frozen for at least half of the trip. 

The Morning of:
Prepare the peanut butter and jelly sandwiches, placing them back with the rest of the bread.

During the Trip:
We typically leave for Anahiem at 6 o'clock in the morning. I wake up the girls, feed them and get them dressed in comfy clothes. They go to the bathroom and brush their teeth. We all eat breakfast before we go. Then we have a snack around 9. and make a bathroom break.
For lunch I make the lunch meat sandwiches for anyone who wants one during lunchtime, typically I am passenger. I lay out a napkin on my lap and make them that way. My husband is also very willing to take on this roll when he rides shotgun also. If someone doesn't want a meat sandwich there is always peanut butter and jelly or cereal (try to drink the milk if you add any or it can spill. A way to avoid that is use containers with lids).

Hotel:
* After we've brought everything into the room, I end up dragging the cooler to the ice machine and filling it with ice. If your room has a fridge that's even better.

*Breakfasts are typically big bowls of cereal. You've got to eat all you pour though because you can't put the cereal down the drains. If your hotel has a microwave consider bringing oatmeal. I've gone as far as to threaten to bring a toaster. Savings from 5 people: $30.

*I had to have at least one cup of coffee every day. It keeps me going. Between me and my mom the coffee in the hotel room is gone quickly. So I now bring the instant coffee and my own coffee creamer. That saves me $4 a cup from Starbucks.

In the Park:

Lunch is typically harder. You can't really bring a meat sandwich into the park because it needs to stay cool. Consider a PB&J, or leave the park, eat something REALLY filling and go back into the park and only have maybe a pretzel ($3.25) for dinner. Lunch in the parks will cost you $50-$60 for 4 or 5 people. Outside is about $30. We've also been known to bring an empty Disney popcorn bucket with sandwiches into the park.

Dinner is also another one. We're typically so full from lunch if we leave that we eat whatever snacks I smuggle in. Disney has become a little more accommodating in allowing outside foods and drinks- but I don't promise anything.


Sunday, October 7, 2012

American Girl Doll Halloween

Alright, Halloween is my all time favorite Holiday- no joke. The girls and I will be heading to the American Girl store soon and we decided our dolls needed to be festive when they visit.

I had already made a generic witch costume, which is actually going to be given to my niece for her bitty baby. Then I wasn't feeling well and in order for me not to go to sleep too early (I'm talking 5pm) I decided to finally try making the semi-no sew tutu. Instantly we fell in love with the first one for my youngest and then my oldest needed one too. She loves spiders and so we used the spider lace/tulle stuff for hers instead of the stars.


  Please note: The "no Sew" tutu is easy to make for anyone. However the tops I make can be trick for new comers to sewing because I sketch my own patterns and have not figure out how to post the real size for all of you to use them.

  For BOTH tops I used Kirsten's party dress top, which you can print for FREE  here (agplaythings.com). I started to make the top the afternoon after I finished the spider tutu, but then I messed up making them too small and had to re-make the pattern longer and a little wider.I added about one inch to the bottom and a 1/8 of an inch all the way around (which also will help for hemming because I notice these patterns run a little tight)
 You will cut the top pattern once on a FOLD for the front and then two separate pieces for the back. Then you will sew the sleeves together, hem the neck line. Next I made the corset: I  used the same type of template, curving the sketch where I wanted it.

Again, I cut one on a FOLD (then cut in half- this makes it so that they are the same on both sides. and then I cut the "back" piece twice. I took some ribbon and pretended to lace the corset up, pinning the ribbon in place so that I could sew it to the corset when I was ready to hem. Once it is ready, pin the corset on top of the shirt and sew back and front of the shirt together.

FOR SPIDER WITCH
Cut spider fabric (using Kirsten's sleeve pattern- normal size) Sew bottom pieces together, then sew to top.  Add a bow to the top of the corset, sew in place.

FOR GIRLY WITCH

BEFORE you sew the back of the shirt to the front of the shirt, hem the outside of the sleeves up, then sew the front to the back. Add ribbon to the top of the sleeves, tie closed. Hide a few stitches in the bow to help it prevent itself from untying. Add a bow to the top of the corset, sew in place.


My other American Girl items:
school supplies
feel better kit  (Just like McKenna's!)
Gymnastics accessories
head band
Minnie Mouse ears
sleeping bags
sleeping mask
pillow dress
accessories
pet accessories

**If you found this funny, useful or both, please follow me. I get a little lonely! Thanks :)