Wednesday, February 27, 2013

Lucky Penny Bottle cap necklace


This will give your little lad or lass that extra bit of luck during Saint Patricks Day.
What you'll need:
Bottle caps (any glass one works. I.E: soda, beer)
Drill and a 1/4inch drill bit
Penny
Chain or yarn
Your four leaf clover  picture

I took a 1/4 inch drill bit and slowly drilled a small hole into a bottle lid Next I took jewelry wire and wrapped it around the top and then looped it to make the spot for the chain or yarn to go through.

The next step was getting the penny secured in by super gluing it into the base. After it dried I added clear puzzle glue for an even more secure hold
 
Let it set while you work on the four leaf clover part for the front of your bottle cap. When you're done glue (or mod podge) the decal onto the front. Let it set and then string your yarn or ribbon through the hole at the top.

Sunday, February 24, 2013

Multicultural Week Door Decoration


As part of our celebration for Multicultural week at our school we need to decorate the doors of the classroom. When I think of Multicultural and kids the first thing that comes to mind is "It's a Small World" from Disneyland. It's both my daughters favorite rides and always the first thing we go on when we arrive at Disneyland.

To recreate this timeless classic I started at the school. I e-mailed (and in more cases physically went  up to) and found out what country or countries best represented the childs family. Then I went and printed off tiny coloring page versions of that flags along with the word "welcome" in that language.

 I colored them by hand because although it takes more time, it also costs more in ink. Something the schools do not reimburse for (nor do they give you to opportunity to use theirs, especially colored)- so I went the less expensive route.After that I took regular printer paper and cut it into 4 squares. I wrote each childs name on the paper and glued the corresponding flags to them.

BOAT and PEOPLE:
for the boat I took red and orange and gave it an angled look at the top. I lined them up together and glued them down. I then took the purple for the top.  I added a wave to give the bottom of the boat a less square look.

For the letters: I used the schools die cutter- super fun to use :)

To recreate the children on the front of the boat took all weekend. First I took different skin colored papers and traced circles using my daughters plates (salad size). From there I found the other colors I would need for hair, necks, clothes and cut them out according to the picture I found online of the kids. I didn't sketch it ( I typically don't) but that doesn't mean you can't. All you have to do once you have the head cut out it line it up over the next color and sketch around it.  I just cut it out by eying it.
When it was all cut out and glued on I used a sharpie to add the extra details.

Once the kids and words are glued on, take your name tags with the flags and "welcomes" and glue them all over the board.

Other ideas for Multicultural week include:
Having kids dress up in their cultures outfits
Potluck for either whole school or by classrooms--this is fun because you get to try new and exciting foods


Tuesday, February 19, 2013

Pretzel Recipe


Alright, I'm a sucker for mall pretzels. I think what makes these so amazingly delicious is: the fact that I actually let  myself submerge them in butter (just like the store)


Cinnamon & Sugar Pretzel Bites

1 package of active dry yeast
2 Tablespoon sugar (or brown sugar)
1 teaspoon salt
1 1/2 cup warm water
3 cups all-purpose flour
1 cup bread flour (if you don't have you can substitute with 1 cup regular flour then minus 2 TBL)

TOPPING
4 Tablespoons melted butter
5 Tablespoons  sugar (for this part we're using sugar substitute. I  like to think that any less sugar is better) mixed with 1 tsp cinnamon


Directions
In mixing bowl add dry yeast, water, and sugar. Let sit for ten minutes. Mix in flour and knead for about 8 minutes. There is something I've learned over the last few years: The stickier the dough the better the rise. I've noticed when the dough is in a perfect ball and a little more firm the end results are a little dryer.

After the dough has doubled in size, it's time to shape them. I like to cut the dough in half and then cut long strips off to form either the pretzel, or the bites.
 

Now, I made mine two ways:
My typical way is to  drop the pretzels into a baking soda bath for a few seconds before baking. The others I left like the recipe. After baking you can see the difference in color that the  baking soda ones have:


5. Place on a parchment paper covered cookie sheet and let rise for 20 minutes. (this only needs to happen when the dough is not already soft!)

6. Bake at 450 degrees for about 8 minutes.
7. Place on cooling rack dip or brush with melted butter and either sprinkle cinnamon sugar or salt onto them. They are best when served warm, if you can get that far. I was making them before lunch and started to snack. 


Original source: http://zakkalife.blogspot.com/2011/03/recipe-cinnamon-sugar-pretzel-bites.html

Tuesday, February 5, 2013

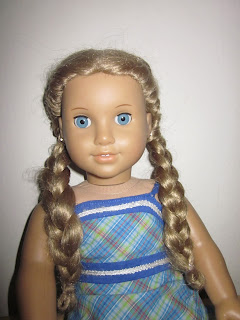
American Girl Hair styles

Finally! I am sitting down and starting my page about American Girl doll Hair styles. I am really into braiding hair (as you'll see) and a lot of the time my hairstyles revolve around that.

Primerose Everdeen:


Primrose Everdeens pigtail french braids were perfect to keep Elizabeth's hair away from my daughters clutches (she "loves" the hair a little too much sometimes)
You start at the front hair line with a braid and slowly add in a new piece of hair after each section is added to the main braid. http://en.wikipedia.org/wiki/French_braid. The trick with Prims is that instead of going toward the back of your head, you curve it downward behind your ear following your hair line.
Swedish Piggie:


I saw a youtube video for this hairstyle since there was no original source.  The easiest way to explain this hair stlye is to take the first part of the hair on the left and hold it off to the side. Take the same amount on the right and brush it to the left. Twist tie it off. Take the left side and brush it to the right. Twist tie it off. Take a lower section of hair from the right and brush it to the left. Twist tie off. Repeat until you have no more hair left.  Given the size of the doll and the thickness of the hair It came out really cute.

 Woven Hair:

Don't be intimidated by this hairstyle. It was surprisingly easy. It is similar to Swedish Piggie's but I think it is actually nicer. The "locks" as I will refer to them as are a lot smaller than the piggies and not tied off after each side.
 

Start with 3 locks of hair (note the 1st lock will be where the 1st side is) Carefully bring the 3rd lock over to the first lock. Next brush over the 4th lock to the right side. Next start a 5th lock on the right side (refer to the picture if you get confused). Continue down your hair until you get to the desired length. Put in pony tail.

French Pony:
This is nothing more than a light french braid put into a half pony tail. 
 
 The side braid:


American Girl Doll Dog Bed

With Valentines Day around the corner, I thought a nice homemade gift would be great for the girls. 
I admit I saw this idea on Pintrest. However, they used foam. I don't have foam. I have a bunch of fabric.


What you need:
Fabric
batting
ruler/tape measure


Directions:

I did this one based on the dog size and you can too! I took Honey and placed her on a piece of printer paper. Next, I folded her down to the size I wanted the base of the bed to be. Mine happens to be as followed:
 
The piece on the left is the front. Eventually I cut the middle down and sewed it closed to make a round middle so the dog could jump into it (see finished project)

Once I found the measurements I needed, I added the batting in the same size. Next I stuck the batting into each piece,  Once it was ready I pinned it together (it does not matter which side is right or wrong if you have one color). After that was finished I sewed the bed closed.

 
You can add bias tape to the trim to give it a fancier look. I tried, but I do have a problem almost every time I use it...for some reason after it's gone through the machine it's never actually sewn to the project even though I've pinned it to it.

**If you found this funny, useful or made it, follow me and share your pictures!**

My other American Girl items:
school supplies
feel better kit  (Just like McKenna's!)
Gymnastics accessories
head band
Minnie Mouse ears
sleeping bags
sleeping mask
pillow dress
accessories
pet accessories
generic witch costume,
Tutu Style Witch Costume 
Scooby Doo Costume
Square Dog bed